 Email Updates

|
This was quite a project but worth it!

While I was working, I grabbed my folding stool and sat down, and got my finger caught in the folding part!
Once my weight was off my feet it took me awhile to get back up - pregnant women do not have good balance!
OWIE!
Boy, did I do a number on that finger! I had to lie down for a bit, and Bamm-Bamm came over to see what was going on.
Bamm-Bamm: Mommy, owie? (Did you hurt yourself?)
Me: Yes, sweetie, Mommy cut her finger.
BB: Wooooo come? (Will the ambulance come?)
Me: No, it's not bad enough for that.
BB: Shoot! (Too bad, I like ambulances.)
Then he left to play with his fire truck. What is it about boys and noisy motor vehicles with flashing lights?
Anyway, I did finish my picture ledge.
I used ½" general purpose molding boards 2½" wide for my picture ledge.
!! Get the straightest pieces you can!! I did not do this and in some places the gap between the board and the wall is noticeable. (maybe my walls aren't too square either?)
1. Cut boards and miter corner ends
Measure your wall and cut the board to that length. For the end in a corner, make your cut at 45°, the long side of the wood should match your wall length.
Also, for these places next to doors and windows, make the end rounded. I did this by making a rough cut and then sanding it smooth with my electric sander. I drew the same a semi-circle on all my pieces, and used this as a guide to sand down to.


2. Nail and glue shelf to wall
What I did:
I put a bead of adhesive along the top rail, butted my shelf against it, held it steady with one hand and started a pilot hole (with the smallest bit I had - a 1/16") at an angle through the shelf, and THEN I nailed it down with a finishing nail. This way worked, but was more work. It's hard to nail anything to the top of a ¼" piece of wood.
What I should have done:
Attach the cove molding with finishing nails and paneling glue (as in the picture below). THEN glue and nail the shelf to that.
I would have still drilled the pilot holes (just a little way!) so the nail goes in at the proper angle. If my nails had been really long, I might even have been able to nail the shelf to the studs!
What I learned: Nail into both cove molding and top rail if you can (at an angle of course), and use long nails to hit the studs too, if possible.

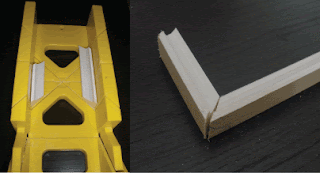
3. Cove molding
I could not for the longest time figure out how to miter cove molding. All my corner are inside corners. I did not have extra molding, so when I messed one up, I glued it back together, attached it to the wall, and coped the abutting piece to fit.
Here's how you cope cove molding...


4. Fix nail holes
I do not have a nail setter, but Ishould will buy one tomorrow. You make sure you have one. Instead, I used another nail (OK lots of other nails - they bend pretty quick), and ended up making a mess of it.
After setting the nails, cover the holes with wood filler or putty.
5. Caulk and paint
I caulked the gaps around the cove molding, and my coped/mitered corners. Then I painted the front and bottom of the shelf, the cove molding, and any nail holes (I had already painted the top of the shelf before installing, so I wouldn't accidentally paint on the wall).


I want to say however that I have no training in this sort of thing. I just do a bunch of research on the internet and give a sporting try.
You can tell I make some mistakes and it takes me awhile. But, if I let fear stop me I'd never try.
I've learned a lot from these projects, and those are skills I can take with me to the next room... and the next project!
Check out some of the later posts! This room is shaping up nicely!


I'm linking this post up with


While I was working, I grabbed my folding stool and sat down, and got my finger caught in the folding part!
Once my weight was off my feet it took me awhile to get back up - pregnant women do not have good balance!
OWIE!
Boy, did I do a number on that finger! I had to lie down for a bit, and Bamm-Bamm came over to see what was going on.
Bamm-Bamm: Mommy, owie? (Did you hurt yourself?)
Me: Yes, sweetie, Mommy cut her finger.
BB: Wooooo come? (Will the ambulance come?)
Me: No, it's not bad enough for that.
BB: Shoot! (Too bad, I like ambulances.)
Then he left to play with his fire truck. What is it about boys and noisy motor vehicles with flashing lights?
Anyway, I did finish my picture ledge.
I used ½" general purpose molding boards 2½" wide for my picture ledge.
!! Get the straightest pieces you can!! I did not do this and in some places the gap between the board and the wall is noticeable. (maybe my walls aren't too square either?)
1. Cut boards and miter corner ends
Measure your wall and cut the board to that length. For the end in a corner, make your cut at 45°, the long side of the wood should match your wall length.
Also, for these places next to doors and windows, make the end rounded. I did this by making a rough cut and then sanding it smooth with my electric sander. I drew the same a semi-circle on all my pieces, and used this as a guide to sand down to.


2. Nail and glue shelf to wall
What I did:
I put a bead of adhesive along the top rail, butted my shelf against it, held it steady with one hand and started a pilot hole (with the smallest bit I had - a 1/16") at an angle through the shelf, and THEN I nailed it down with a finishing nail. This way worked, but was more work. It's hard to nail anything to the top of a ¼" piece of wood.
What I should have done:
Attach the cove molding with finishing nails and paneling glue (as in the picture below). THEN glue and nail the shelf to that.
I would have still drilled the pilot holes (just a little way!) so the nail goes in at the proper angle. If my nails had been really long, I might even have been able to nail the shelf to the studs!
What I learned: Nail into both cove molding and top rail if you can (at an angle of course), and use long nails to hit the studs too, if possible.

3. Cove molding
I could not for the longest time figure out how to miter cove molding. All my corner are inside corners. I did not have extra molding, so when I messed one up, I glued it back together, attached it to the wall, and coped the abutting piece to fit.
Here's how you cope cove molding...

After you've drawn the shape of the abutting piece on the back of the molding, cut it out with a coping saw (my cut was rough and I sanded it until it fit better).

My coped corner.
Then I figured out how to miter the cove, and did this for the rest of my corners. Here's how to miter cove molding...
outside corner

inside corner
4. Fix nail holes
I do not have a nail setter, but I
After setting the nails, cover the holes with wood filler or putty.
5. Caulk and paint
I caulked the gaps around the cove molding, and my coped/mitered corners. Then I painted the front and bottom of the shelf, the cove molding, and any nail holes (I had already painted the top of the shelf before installing, so I wouldn't accidentally paint on the wall).

It looks great.

I want to say however that I have no training in this sort of thing. I just do a bunch of research on the internet and give a sporting try.
You can tell I make some mistakes and it takes me awhile. But, if I let fear stop me I'd never try.
I've learned a lot from these projects, and those are skills I can take with me to the next room... and the next project!
Remember the before from yesterday's post?
and some more gorg afters!
Check out some of the later posts! This room is shaping up nicely!


I'm linking this post up with


Great job! I LOVE it! And you're too funny! Thanks for the interpretation of the conversation between you/your son and I hope your finger feels better. :)
Thanks for linking up your creativity to the DIY Project Parade!
Roeshel
Can't believe you did this by yourself--great job!
Found you via Metamorphosis Monday . . .
I love what you did! Looks great :)
Oooh, I'm sorry about your finger. Your picture ledge looks great!
: )
Julie M.
It looks great! I just did my bedroom with board and batten.
Very well, Look Great.
mission style wall mounted shelves