Showing posts with label diy. Show all posts

Missing My {Wo}Man Cave


The garage-workshop is starting to look great.

The drywall is all up, and my Dad and I will finish “mudding” it today… then paint this weekend!

There’s still a ton to do, and a few special things I’m hoping for {new pull-down attic ladder, washer, dryer, sink}.


It’s been weird not having my workshop though.


All my projects have been on hold while my table saw slowly rusts under a tarp in the back yard, and my tools are spread in piles throughout the house.

I’ll be inspired to do a project, and in my mind I reach for the tool off my pegboard tool storage book, and then… remember… that it’s somewhere in a pile in the guest room.

 P5300017

I think it’s making me a little depressed.  I was sick for 7 weeks too, with seriously sore ribs from coughing.  Now that I’m finally feeling better I’m ready to build and blog (and maybe clean… maybe ). 


More reason to hurry up and git’er done!


New to Pregnant with power tools? Don't miss a post and subscribe here... Bookmark and Share

Let’s Blow This Joint {Blow-In Insulation}


We got a lot done today and I feel good {and tired!}


First I spent Saturday night {with a pair of flashlights} scrambling to finish the electrical work before the insulation went in today.

We got our insulation blowed-in, blew-in, installed, in under 4 hours {‘course it was only 360 sq. feet of wall – so we’re pretty slow}.


It’s a dirty job.  I wouldn’t want to do this in the house…

The vapor barrier held quite well {I was worried the pressure from the insulation might pop it off the wall – it was no problemo.}

I’m glad {really glad} I put 2½” holes in the wall for blowing in insulation – the attachment on the blower was 2½” and the reducer {to 2”} caused a backup {I’d say install was easier on the stud-n-vapor-barrier-wall}. 

Funny story. 

We were using this stupid thing to poke the bale into the thresher.  And the hook fell off into the thresher.  Haha… hilarious, right?  So we unplugged it and scooped out all the insulation into a box looking for the hook.  I got down deep into the thresher poking around for it.  Then I grabbed a flashlight and looked through the output tube.  We searched for 30, 40 minutes.  Couldn’t find it.  Arrggh.  So we gave up and started putting the insulation back in.  Guess where the hook went?  We’d scooped it up with the insulation without realizing it.  It was never stuck inside the thresher mechanism {so that’s good I guess}.

Sound like it was hard, dirty, dusty work?

YUP.  But I’d  do it again.


I love the cellulose we used.  No itchies {which is good because there was dust everywhere!  Looked like we were hit with a blizzard made out of shredded newspaper}.


Unlike fiberglass, cellulose is very “green”, decomposable {so the stuff that ended up all over the yard neighborhood is OK}, and it also has great sound reduction properties {so they’ll forgive me the mess ‘cause they can’t hear my table saw anymore}.


Anyway, we spent the second half of the day “rocking” the room {but you’ll have to wait to hear about that because I need a long nap}.


New to Pregnant with power tools? Don't miss a post and subscribe here... Bookmark and Share

DIY Book Nook for the Kids

I’m pleased with the new book nook in the playroom.

It was maybe the cheapest build I have ever done – most of the lumber was from MDF scraps left over after other projects. 

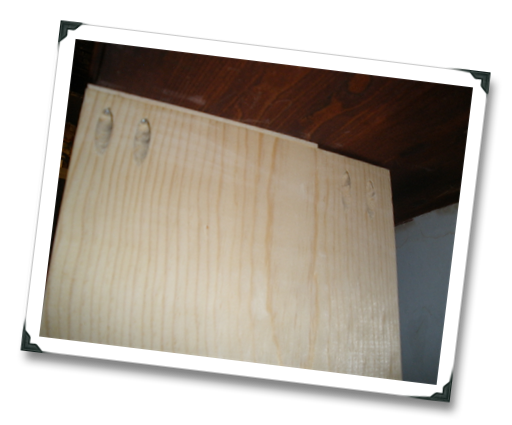
At just 3.5 inches deep – it doesn’t use a lot of wood.   A 3/4” spade bit cut the sides for the dowels.
The wall is a different kind of square at the top and bottom, so I used copious amounts of caulk at the edge to hide the gap.

My handy dandy Dremel MultiMax cut holes in the 1/8” hardboard back for the outlet and light switch.  I used box extenders to “extend” the outlet and switch box to their new depth with the bookcase in place (see this post for more on box extenders).

I also used it to cut down the outlet cover so it would fit (a little sanding cleaned the edge right up).  Don’t use your table saw for this – it will shatter the plastic (I learned that the hard way ;)

Now, the playroom is still messy – this doesn’t help the kids pick up their books (yet!), but they don’t dump them in a pile just ‘cause anymore.

For the uninitiated, the light switch can be a fun treasure hunt (but since the room has a skylight, it only matters at night).

Now I just need to build a little sofa or couch, and I can see sitting here reading to the boys “all day long” (as Bamm Bamm would say).

What are your favorite playroom or kids’ room storage?  Favorite kid’s book?  I like Where’s My Cow, by Terry Pratchett!

New to Pregnant with power tools? Don't miss a post and subscribe here or Bookmark and Share

52 Weeks


of Organizing starts here…


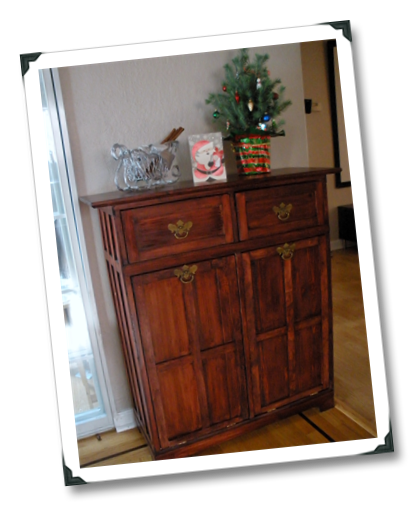
with the Recycling Center I built over the holidays!

Since we started using this, the change at our house has been amazing.


Junk mail used to pile up on the table.  Empty milk cartons and yogurt cups sat on the counter until I got around to taking them outside.  Aahhh!

Now, into the handsome cabinet bin they go, hidden until I take out the trash.  Plenty of room for 13 gallons each of trash and recycling… this has been the perfect way to kick off Laura’s 52 Weeks of Organizing Challenge!


Now I’m working on week 2’s project (book storage for my kids’ playroom), and the other 50 weeks of organizing.

Doing a little every week (with the occasional big project), will help keep me from becoming overwhelmed.  This year I’m getting organized!


Are you getting organized this year?


I'm linking this post up with


New to Pregnant with power tools? Don't miss a post and subscribe here or Bookmark and Share

Ikea Furniture Transformation


I am so excited to share my new Recycling Center with you!

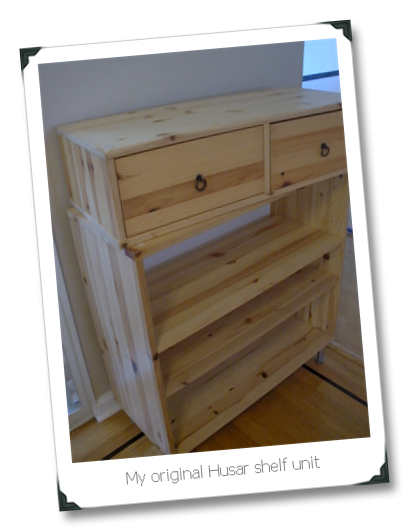
It wasn’t much to build because I used an Ikea shelving system I already owned (but am so over that knotty pine).

The biggest impact comes from the addition of some lattice wood, which is cheap and easy to use!  I love the difference it makes!


What I had:
IKEA Husar shelf and drawer unit
antique drawer pulls (10 for $3 at the thrift store)
pocket jig and screws (optional)


What I bought:
~30 feet lattice strips (~1.3” wide)
1x8 pine lumber
1x4 pine lumber
hinges
hinge supports
Minwax Bombay Mahogany PolyShades stain


The Husar is discontinued (and I really miss it – decent solid wood products do not seem to interest Ikea much these days), but you may be able to find something second-hand.


I removed the drawers and shelves and firmly screwed the two units together.

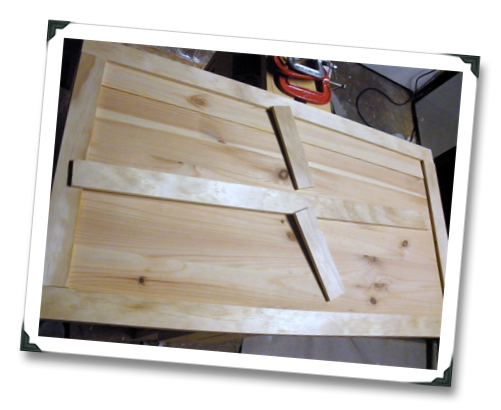
Then I just started putting on the lattice – which was pretty fun.   This stuff is easy to cut and just needs a little glue or small brad nails. 

Attach strips of lattice to the sides with wood glue (I used Gorilla Glue) and clamp or nail.

I also put strips across the front and sides where the drawer unit meets with the shelves, and around the drawer fronts.

I don’t have pictures, but I built a new top out of a 1x8 and 1x4 lumber screwed onto the old top.  I cut a bevel edge with the table saw for looks.
The footer was cut out of 1x4 with a jigsaw and screwed on from below.


The hardest part… adding a divider and building the doors out of the old shelves.  Here’s where my pocket screw jig came in handy…

used pocket screws to attach the divider inside the shelf unit.


The shelves that I removed from the unit weren’t wide enough, so I screwed a narrow strip of lumber to one side (with – what else - pocket screws!)

They received the same lattice treatment and stain.

The antique pulls from the thrift store were a serious score! I just needed to drill holes in the doors for them.

Attached the doors to the cabinet with some hinges at the bottom.

Added a single hinge support to each door.  These will keep the door in whatever position you place it in and helps to hold it shut too. 
 

I put a simple double-roller latch in each door also, but probably didn’t need to (well, I’ve got toddlers, so maybe I did need to).   


I love it!  The red tone of the stain goes well with my kitchen (I am thinking a third coat so it’s really dark – and maybe that’ll even it out too?).

Storage and (finally!) a place for recyclables and trash!  What’s not to love!

I’m taking the rest of the week off for Christmas!  Hope you all have a great holiday weekend!

I'm linking this post with


New to Pregnant with power tools? Don't miss a post and subscribe here or
Bookmark and Share
Related Posts with Thumbnails