Cool Tools: Jigsaw

The Jigsaw

To continue our series on Cool Tools let's talk Jigsaw...  If you only have 1 saw, it should be a jigsaw...


What It Is

The jigsaw is basically a reciprocating saw for cutting curves, which some believe is a must have for furniture building because it can be used more artistically than other saws which can only cut straight lines. It is also the most versatile saw, cutting many different thicknesses and materials!

Jigsaws are great for cutting wood, plastic and metal.  The strongest jigsaws can even cut thin steel.  Jigsaws do come in cordless varieties, but remember that they will be mush less powerful.  Finally, you can even buy an pneumatic jigsaw, one that works with your air compressor (cool!)

Since I don't use one very often, I have an ancient, but perfectly capable *** jigsaw (no fancy bells or whistles, but it is corded - I like my tools to have some power).  It gets the job done, but an orbital jigsaw cuts faster with less effort and wear on the blade.

How to Use

I had a video of my using a jigsaw, but it has mysteriously disappeared :(

Basically, you draw your cut line on the wood, and holding the jigsaw firmly against the wood cut near(ish) this line.  This takes some elbow grease, since I find I have to push the saw along the wood to cut (this is not the way the saw should work, so yes my old saw is probably not working as well as it should anymore).  If I were to start doing intricate or detailed work (jigsaw puzzles), I would likely purchase a new jigsaw.  I always use a sander to take off the last millimeter of wood so my line is perfect and the edge is smooth.

Another cool thing about a jigsaw is that it can be turned into a stationary tool (like a bandsaw) with a table accessory clamped to the edge of a workbench!!  I like this idea, but haven't been able to find out more about it...

Finally a coping foot can allow you to cope crown molding with your jigsaw!  Sounds like a jigsaw is an all-around pretty handy tool!


Helpful Tips

Bookmark and Share

Thrifting Through Thursdays

Yet again, I've scraped together a half hour to stop by the thrift store and I was not disappointed!

  • I found a crib sheet to match the bedding I made.
  • A 4" wide paintbrush in mint condition!
  • A toy for my (spoiled) son - OK let's call it a birthday present!
  • A tin perfect for découpage (like the stamp covered tin I did here!)
  • The BEST thing - these flushable diaper liners!!!  If you've ever used cloth diapers, you know how great these are (and how expensive).  I got 5 roll (5!) for $1.99
Whoo Hoo!  Can't beat that (especially since they must be bought online btw, adding shipping to the overall cost!) Bookmark and Share

Delicious-ness: A Better About Page


I read this great article and was inspired to rewrite my About Page! How is it that some people just know how to blog (and write great articles)!
Check it OUT (and let me know if there's something I missed that you want to see)!!!

 The picture speaks for itself!!  Love this idea!!!!!


This was such a darling idea (on such a darling, tough, little guy) that I am going to HAVE to make one for my tough little guy.  THANK you for this tutorial Cheri!!!!  I Love It!
 
P.S. I love MissDDT's Marketing Finds series, even though I don't really think of my blog as something I "market".  Maybe I should change that?  I have prettied it up a bit, but that's because it was so fun to do! Bookmark and Share

Bathroom Storage

Wanna add a little fun and function to the bathroom medicine cabinet?
I built this cute little planter box for mine!


Bookmark and Share

Trendy Blog Award

I am so flattered!!!

My friend Sunny @ the trendy Life In Rehab gave me this award!


I'd like to thank my gorg husband, my beautiful sons, my mom and sisters for their support... LOL.
Thanks Sunny, this made my day!  And I love your sweet words (though I feel guilty - I haven't had very many "major projects" since little man was born a month ago!)

So I'll make sure the love continues!  What  a great way to discover new blogs and promote some of your bloggy buddies!

Here’s how the award works:

  • To receive this award, promise to share this with 10 other BLOGS that you think are Trendy too.
  • Post about your award in your blog.
  • List your Top 10 Trendy Blogs.
  • Share with them.
  • Leave a link to the Trendy Blog Button.
  • Tell them they need to give this award out to 10 as well.
The Feminist Housewife -  Caroline and I are kindred spirits - I swear!  I love her!  She's gorgeous and smart, and has a great sense of style.  Her blog is all those things and more!

The Thriftress - Sarah is one "thrafty" "crifty" girl after my own heart.  I wish I could be as "thrafty" as she is!  I'd like to go shopping with this gal! (Hope she doesn't mind mulitple "awards"!!  I'm not her only fan!)

White House, Black Shutters - My friend Ann Marie tackled one huge reno.  I love renos (other peoples), and now she's decorating and doing crafts and projects while expecting a new baby any day now!  I love it when pregnancy doesn't stop you from having fun (tho' a new baby will slow you down if nothing else can).  Love ya, AM!

Potholes & Pantyhose -Rebekah cracks me up, especially with that sledgehammer she's sporting.  This babe had me at "pouring concrete"... I'm just jealous I can't pull off "powertool" as stylishly as she can!

Mom and Her Drill - speaks to me.  Love the blog title, love the building and painting, and Katy and I have other stuff in common too (I also can't cook, and am disorganized), but mostly I love her 'cause she loves her tools!!!!

Random Acts of Flair - MissDDT is a true Arteest!  She knows her flair - and that's a fact!  Check out her shop!

Peppertowne - This blog has some of the BEST tutorials EVER.  Super photography... very inspirational!

Three Dogs At Home - Traci is showing off her skills in the craft department!  She also has the cutest assortment of adorable animal friends ever!

Thrifty Parsonage Living -  How do you transform an parsonage into a home on the cheap while raising a big family?  Joy's doing a great job and sharing each step!

I Am Momma Hear Me Roar - Cheri has 2 boys just like me - but she seems to have a lot more energy!  I love her ideas, crafts and sewing projects.  How she does it all I may never know!! Bookmark and Share

Thrifting Through Thursdays: Urban Ore

Urban Ore is my new favorite place to go/be in the Bay Area.

It's like Disneyland for DIY/crafty/scrappy people!  A mix of junkyard, thrift store and recycling center!! Funky Junk Donna you need to come visit me and we'll go to Urban Ore together - you'll love it!

This place has it's own set on flickr; it's inspiration for all artist and creative types, but I keep forgetting my camera when I visit (I know - bad blogger, bad!  Go sit in the corner!!!)

So I found a bunch of great pics via apartment therapy!  In this instance I think a picture speaks 1001 words, so here they are!!


Bookmark and Share

Are you Pregnant (with Power Tools)?

I am having such a hard time nursing my little man (4 weeks old yesterday!)

Got a prescription for a galactagogue (to increase my milk supply), and it really seems to be helping.  But I've also been having sharp, shooting pains, and white/purple nipples - which sounds like vasospasm (from bad latch? Raynaud's?).  Applying heat is definitely helping, but it's still the hardest part of being a mom right now.   Anyone relate?

I've noticed a bunch of blog goddesses are now "pregnant with power tools".  I say that because they are all pretty crafty, even if they don't use power tools very often, and they're all expecting!

I wanna send a huge CONGRATULATIONS to all these fine crafty ladies!

Ann Marie @ White House, Black Shutters
Whitney @ Shanty 2 Chic
Ashley @ Shanty 2 Chic
Martha @ So Lovely Creations
Tiffany @ Making the World Cuter
Mama E @ Home and Hearts
Lorchick @ ON{thelaundry}LINE
Ali @ The Blessed Country Mom

I'm sure I forgot somebody! (I should've been making a note of all these expecting moms as I read their blogs!)
Drop a comment if you're expecting too and I'll add you to my list (this will be fun!!! a little club of preggy ladies). Bookmark and Share

Delicious-ness: Table Saw!

Yipee Skipee!  My in-laws gave me a table saw!  I wonder how they knew I wanted had to have one?

A 10 inch Skilsaw table saw.  This baby will miter, rip, do dado and rabbet cuts - nice...
Look at her - isn't she pretty!


Bookmark and Share

Nursery Revealed!

So I am still sewing the crib quilt for my little man, but the rest of the nursery is pretty much done!!

I love this room!

I like sitting and nursing here while the late afternoon sun hits the soft green walls.


Bookmark and Share

Thrifting Through Thursdays: a day late

Lucky me, I got to go thrift shopping today!  A gift to me on Bamm-Bamm's 3rd birthday!

Yes, today is Bamm-Bamm's 3rd birthday - we also stopped by McDonald's for ice cream and playing - so I'm good with the kid (and maybe not so good with the junk food police :)

I scored big-time at the thrift store!!

Bookmark and Share

Cool Tools: Miter Box

The Miter Box and Saw

Some of you may wonder why the first tool in the Cool Tools Series is NOT a power tool!

Don't get me wrong - I love power tools, but most of my tools are simple "hand-powered" or manual tools.  They have their place in the complete workshop and often provide something you can't get in a power tool...  the miter box is a good example of this.

Bookmark and Share

Electrical Wiring Tutorial

I've wired a lamp and wall sconce nightlight.
Each of these has touched on the how-to’s of electrical wiring.

This post will expand on those tutorials and explain why I am suggesting doing things a certain way (though I am not an electrician).  I will probably write a later post on household wiring (hard wiring through the wall into the home’s electrical grid).

Here are the dets, folks!
**Always do these steps with lamp or wire UNPLUGGED!

Electrical Power Cords

Plug on one end, open wires on the other.  If you’re going to wire your own lamp this is where you start!
Lamp cords are made of two wires within the same insulating sheath (plastic covering).  Because of this, most lamp cords are also one color, so which wire is “hot”?

Electricity and the “hot” wire

Being “Hot” signifies that “power”, electricity, is flowing through that line/wire from the outlet.  The other wire is neutral (at ground potential and carrying electricity back to the outlet) and much safer.
The wires themselves are identical, which one becomes “hot” depends on the plug and it’s relationship to the outlet when plugged in.
There are a bunch of ways to tell which wire will be “hot”
  • Most lamp cords “identify” the neutral wire with writing, ribbing, a ridge, or rough texture.
  • On “polarized plugs” the wire leading from the wider prong of the plug is neutral.


When wiring up to a sconce (or any usually hard-wired lamp) the “hot” attaches to the black wire and neutral to white.

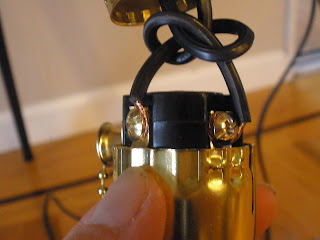
When wiring to a lamp socket, “hot” attaches to the brass screw or terminal, the neutral to the silver screw.

Does it matter which side is wired to hot?
Yes and No.  The cord doesn’t care, the outlet doesn’t care, even the lamp doesn’t care.  If you do it “wrong” there’s no real risk of fire… so why care?
You should connect the wires properly to avoid a pretty serious shock! The “hot” terminal connects to the “hot contact”, a small metal tab inside the lamp socket, and the neutral goes to the threaded base of the socket.  If switched around, the socket or other metal parts of the lamp could become “hot” and shock you!  It’s happened to me! 
On non-polarized plugs (ones with equal width prongs) you can send electricity up the “neutral” wire just by plugging it in that way – the wire attached to the prong in the "hot" side of the outlet will be hot.   I have some old lamp plugs like that; I usually don’t care, and just unplug these lamps when replacing bulbs.

Current (Amperage)

When buying bells and whistles for your electrical wiring (such as a switch), you’ll want to make sure you buy one rated for the voltage and current of the lamp/bulb.

Household voltage is 120V for homes in the USA.
We can use this to convert the wattage of your light bulb to amps!

Watts = Amps x Volts, so a 120W bulb will draw 1 amp on 120V.  Since most switches are rated 3A or more, this isn’t a problem for most applications. 

Wire Stripping

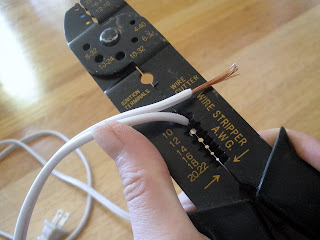
In order to wire your lamp, you’ll need to strip the end of the electrical cord.
1.  Split the last two inches of the end of the cord.
2.  Strip away ½" of the insulation on each wire.

I use a “wire stripper”, but it can be done without one
The inside of lamp cord is just a bundle of thin copper wires, be careful not to damage them when stripping .

Using a wire stripper
Wire strippers have a row of cutting edges in a variety of gauges (sizes).  Use the right gauge for the wire you are stripping.  (The gauge is usually printed on the cable - 18 is common).  Self-adjusting strippers take out this guesswork by automatically selecting the proper position.


Place wire in the proper gauge spot, squeeze handle around wire and pull toward the end of the wire, the insulation should be cut from the wire and pulled off leaving the copper bundle intact.

Connecting wires

These wires should be wrapped clockwise around the lamp socket terminal screws and tightened


OR
twisted clockwise together (called splicing) with the sconce wires and covered with wire caps.


Wire Caps
Wire caps (also called wire nuts) prevent your spliced wires from touching stuff, which can cause shorts and even fires.  They also come in various gauges (sizes).  For joining lamp cord with other similarly sized wires, I use big orange colored caps (join together #18 to #14 wire sizes). I'm probably using the wrong size - but it works!
Twist them clockwise onto the spliced wires.  You don’t want to see any exposed copper!

If you are wiring a sconce to a plug (like this), you’ll want a pancake box.


The pancake box (metal open topped “box”, or cylinder, for sconces) attaches to (or inside) the wall, provides a place to attach the sconce (see the arrows pointing to the screw holes), and provides important safety security! 
When you use wire caps properly (no exposed copper), and use a pancake box, you are doing a good wiring job and greatly reducing your risk of problems.

Sorry for the LONG post – hope it helps at least one person!  Let me know if I left anything out!!! Bookmark and Share

Thrifting Through Thursdays

Wow, I have really missed thrift store shopping...

I missed thrifting more than I have missed getting 5 straight minutes for a hot shower!

But this last weekend, the hubby and baby and I shopped our local thrift (Thrift Town) !

We needed some warm PJs in newborn size - Score!!


Bookmark and Share

Etched Porch Sconce NightLight

Happy Cinco de Mayo!!

Getting up to nurse and change diapers during the wee hours is hard - harder when it's dark!


So I fixed up a dirty (really dirty), old (really old), porch light.  Etched some numbers on the glass (for fun), and Wired it for a nightlight!

Bookmark and Share

Delicious-ness is back

It's been a busy last 2 weeks, and blog reading has been put on the backburner.

But... I have seen a project or two that I thought were especially cool.

1.  An unusual picture frame by Laurie @ Scene of the Grime


This gorgeous frame is made from a plastic garden border!

Makes you wonder what else can be made into a cool picture frame!

Bookmark and Share

Newborns are Nocturnal

Hi,
Just poking my head above water for a sec to say hi - I miss you guys, I'm OK, I miss blogging and making stuff!

This new little man of ours doesn't like to sleep at night - what's up with that?
I also must have forgotten how hard breastfeeding is - ow!  But I'm not giving up (OH, but I really want to...)

Hopefully life will one day return to "normal".

I've been working on a project for the nursery (out of necessity as much as for the joy of it).  A really easy simple project (but it's taking me days to do it!)   Hopefully I'll be posting that soon.

Until then, more baby pics!


Bookmark and Share
Related Posts with Thumbnails