Showing posts with label electrical wiring. Show all posts

Until the Shock Wears Off


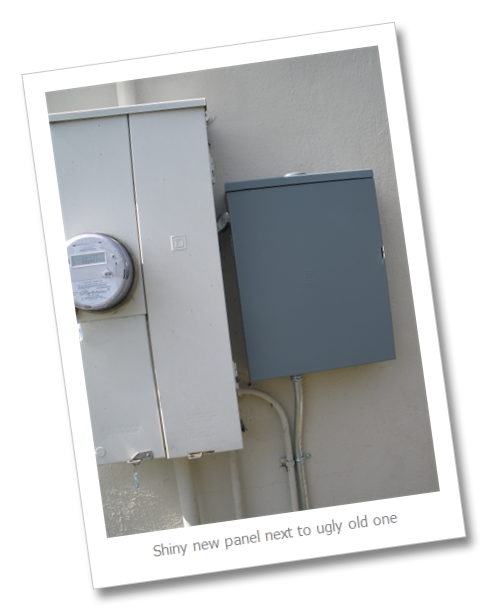
Spent $1100 adding a 100 amp subpanel to our household electrical system this week… {not gonna DIY that one – ya know?}

Ouch.

   But it sure is pretty yes?


And I also get 4 spots for adding circuits in the future, a spare circuit!, and a dedicated 20 amp line to the garage for my dust collector {whoo – hoo!}.

Still, I am not sure I can afford tic-tacs, much less any new power tools.


Getting ready for the big insulation blow-in tomorrow!!! Eeee!  And I’ll let you know what we’re doing to get ready.


New to Pregnant with power tools? Don't miss a post and subscribe here or Bookmark and Share

Built-In Bookcase: Moving a Light Switch

I needed to move a light switch that was on the wall where my final bookcase unit is going.

I started by Opening up the Light Switch to see what I was dealing with (after turning off the power!)

P8300026

Looks like I have only 1 pair of wires to deal with – coming from the attic.  So my next step was Check the Attic.

P9250010

Good news, my wire goes straight up to a junction box in the attic.  But the bad news is the wire isn’t long enough to be moved over 1 foot.  (Wouldn’t it have been nice if the installer would’ve given a foot of extra wire “slack”!)

Anyway!  Moving this light switch is a go for 2 reasons.

1.  I only need to move it over to a neighboring wall by about a foot.  And

2.  the too short wire can be easily replaced by a new 5 foot length from the switch to the junction box (instead of all the way to the light – which would have been too much work).

I Cut a Hole for my New Switch, making sure to be away from the corner and not on top of a stud.  I put my hole 7 inches from the corner, 2” away from the corner studs.

P9150035

I measured the distance from the corner to my new location, and took that measurement to the attic with me.  I made my new hole into the wall space right over where my new switch will be.

How to tell where your walls are from inside the attic.

To start it helps to have some rough landmarks in the attic… like where the stairs or opening from below are, any skylights, can lights from the kitchen, known walls (these are the most helpful!)

Let’s use these pictures to help me explain…

P9250008

Since I know where the main load bearing wall is (right along where the old house meets the addition – the new side is covered by plywood in the attic…) and I know where the wall with the bookcases is (the framing goes up to the roof here), I can determine where my new light switch wall is too.

Top plates will often be 2 2x4s thick, so use a very long drill bit to drill through them.  Here are some example pics. 


from http://www.structuredhomewiring.com/WiringExistingHome.aspx

I Drilled a Hole Through the Top Plate for my wires.  I have a double top plate, so I use a long 5/8” borer bit to drill a good size hole for my wires.

P9250012

Then I Ran Fish Tape down from the attic hole to the new hole in my wall.

P9250013

Fish tape:  is this green thing in the photo.  It is basically a reel of a bendy metal strip with cap on the end.  Downstairs I attached a length of electrical wire () to it.  In the attic, I pulled the wire up on the fish tape – I “fished” for my wire and caught it. Haha. 

Connected the wires together in the attic junction box.  Hot to hot (black wire to black wire, etc).

P9250020 P9250018

In the living room, I slipped the other end of the wire through an electrical box, which I attached to the wall.  Use an “OLD WORK” box!  This gets confusing, but New Work means working in a new building (before the drywall goes up), while Old Work means adding to an old building, where the walls and all are already in place.

Here’s some idea how to use “New Work” electrical box.

Cut your hole, sized for the box body.  The wire goes through one of the flaps in the back of the box.  With the box in the wall, tighten the tab screws to pull the tabs against the drywall.


from http://www.structuredhomewiring.com/WiringExistingHome.aspx


P9250026

Almost Done!

P9250034

Attach the light switch to the wires and attach to the electrical box.  Hot (black wire) on top.  Check that it’s level and put the cover back on!

P9250036 PA020002


Whew!  Now I have to patch over the old electrical box… that’ll be in my next post Okay ;)

I’m starting to wonder if this project will ever be done!


New to Pregnant with power tools? Don't miss a post and subscribe here... Bookmark and Share

Built-In Bookcase: A Box Extender for My Outlet


My bookcases are being built on a wall with two existing outlets, which I would like to keep.  This is not a hard project, it just requires some power tools :) and…

a box extender which you can get at the hardware store.

A Box Extender fits over your current electrical box and “extends” it from as little as 1/8” up to 1-1/2”, so it is a must if you want to put in a new wall over an old one, or build in cabinets or bookcases.

Here’s how I did it:

Before you start, turn off the power to that outlet (and test that it is off).  I have a handy label inside my fuse box that lets me know what each of the switches controls.

1.  Measure.

Measure from neighboring cabinet or the wall, and the bookcase base or floor to the center of the outlet.  Then measure from the edges of the case and mark that spot on the cabinet back.

2. Cut your opening.

Move the case away from the wall, and cut or drill a small hole over your mark to check the accuracy.  If the hole lines up over the outlet when you put the case back, you can roughly enlarge the hole to half the width and height of your electrical box.

Do this with a Dremel Multi-Max, a jigsaw or reciprocating saw.

P9190056

Once the hole is larger, you can determine the precise cuts you want to make to exactly line up with the outlet, and mark or draw those lines on your cabinet before cutting.  Move the cabinet away again, make the cuts and re-check the alignment.

P9190054

3.  Remove the outlet from the electrical box.

This outlet looks like it is daisy-chained with the neighboring outlet, so it has 4 wires (plus the ground) attached to it.  Some outlets will only have 2 wires (and ground).  I moved the cabinet away again, and then I unscrewed all the wires going to the outlet, keeping careful track of which goes where, so I can put it back together safely.

P9190066 P9190068


4.  Install the box extender.

I moved my cabinet back in place again (for the last time, so I made sure you are ready to leave it there ;), and placed the box extender over the hole I cut and over the original electrical box.

P9190069

5.  Reattach the outlet.

Then I screwed the wires back onto the outlet, and screwed the outlet back into the electrical box and the extender.  The extender will come with extra long bolts to make this easier to do with the deeper box.   (However, if you need to buy longer bolts for this, the standard size for the bolts on electrical boxes is #6-32.) 

P9190075

6.  Reattach the cover.

If your cuts were a little too big, or you slipped and accidentally scratched or cut your backing (and paint won’t cover), you can buy an oversized outlet cover to hide your boo-boo. 

P9190077

Outlet covers come in multiple sizes. 

TaDa!

P9190078

Don’t forget to turn the power back on when you are done :)

Whatever you do, don’t just build your bookcase in front of the outlet, hiding it back there.   It is illegal and dangerous to place permanent furniture (cabinets, built-ins, etc) in front of an outlet blocking it.  They need to be accessible by electricians, inspectors, the fire department, future home owners.  Never permanently “hide” an electrical outlet where you can’t get to it.

It is easy to build your bookcase keeping the original outlets in place… just use a box extender!

I’m starting to get ready to finally finish these bookcases!  Yay!  I still have some posts coming up though, so stay tuned!


New to Pregnant with power tools? Don't miss a post and subscribe here... Bookmark and Share

Bathroom Light Remodel

So today I finally succeeded in checking an item off my to-do list!

I finished refinishing my $10 thrift store light fixture and installed it.

Painting it with brushed nickel spray paint was a cinch…


but then the lamp shades I had didn't fit (plus Bamm-Bamm broke one today) and installing it was't going so well either...

So I went to the store and picked up what I needed...

3 glass light fixture shades and this


an offset swivel crossbar... to allow me to install the light even though the screw holes don't line up. 


I love it!!! Goodbye Miss Piggy Lights!!


New to Pregnant with power tools? Don't miss a post and subscribe here...

I'm linking this post up with


Bookmark and Share

Vintage Car Bedroom: Headlight Nightlights

The next step in the transformation of my son's bed into a "car" (or rat rod, as we've started calling it) is the addition of car headlight nightlights.


I picked up a pair of these push-on lights for $1 each at the thrift store.


They didn't work anymore, so how can they be turned into plug-in nightlights? 
Bookmark and Share

Genie of the Lamp


I'm like the crazy cat lady, only with lamps! 
 
This is my 3rd, no wait, 4th lamp tutorial on Pregnant with power tools!  And I have 3 more in the pipeline!

Maybe I should rename the blog Genie of the Lamp?

You may remember the tin can pendant light I submitted for the last Iron Craft Competition...


lights2

Bookmark and Share

Vintage Car Bedroom: Can Pendant Lights

I've been planning and working on Bamm-Bamm's (my 3 year old's) vintage car bedroom and finished the first transformation into making this space "big boy" (all grease and metal!)

And I have The Iron Crafter Competition @ Fireflies and Jellybeans to thank for the inspiration!


The Secret Ingredient: Recycled Cans or Tins

I love it, and I love the Can Pendant Lights I built for Bamm-Bamm's room!

Bookmark and Share

Electrical Wiring Tutorial

I've wired a lamp and wall sconce nightlight.
Each of these has touched on the how-to’s of electrical wiring.

This post will expand on those tutorials and explain why I am suggesting doing things a certain way (though I am not an electrician).  I will probably write a later post on household wiring (hard wiring through the wall into the home’s electrical grid).

Here are the dets, folks!
**Always do these steps with lamp or wire UNPLUGGED!

Electrical Power Cords

Plug on one end, open wires on the other.  If you’re going to wire your own lamp this is where you start!
Lamp cords are made of two wires within the same insulating sheath (plastic covering).  Because of this, most lamp cords are also one color, so which wire is “hot”?

Electricity and the “hot” wire

Being “Hot” signifies that “power”, electricity, is flowing through that line/wire from the outlet.  The other wire is neutral (at ground potential and carrying electricity back to the outlet) and much safer.
The wires themselves are identical, which one becomes “hot” depends on the plug and it’s relationship to the outlet when plugged in.
There are a bunch of ways to tell which wire will be “hot”
  • Most lamp cords “identify” the neutral wire with writing, ribbing, a ridge, or rough texture.
  • On “polarized plugs” the wire leading from the wider prong of the plug is neutral.


When wiring up to a sconce (or any usually hard-wired lamp) the “hot” attaches to the black wire and neutral to white.

When wiring to a lamp socket, “hot” attaches to the brass screw or terminal, the neutral to the silver screw.

Does it matter which side is wired to hot?
Yes and No.  The cord doesn’t care, the outlet doesn’t care, even the lamp doesn’t care.  If you do it “wrong” there’s no real risk of fire… so why care?
You should connect the wires properly to avoid a pretty serious shock! The “hot” terminal connects to the “hot contact”, a small metal tab inside the lamp socket, and the neutral goes to the threaded base of the socket.  If switched around, the socket or other metal parts of the lamp could become “hot” and shock you!  It’s happened to me! 
On non-polarized plugs (ones with equal width prongs) you can send electricity up the “neutral” wire just by plugging it in that way – the wire attached to the prong in the "hot" side of the outlet will be hot.   I have some old lamp plugs like that; I usually don’t care, and just unplug these lamps when replacing bulbs.

Current (Amperage)

When buying bells and whistles for your electrical wiring (such as a switch), you’ll want to make sure you buy one rated for the voltage and current of the lamp/bulb.

Household voltage is 120V for homes in the USA.
We can use this to convert the wattage of your light bulb to amps!

Watts = Amps x Volts, so a 120W bulb will draw 1 amp on 120V.  Since most switches are rated 3A or more, this isn’t a problem for most applications. 

Wire Stripping

In order to wire your lamp, you’ll need to strip the end of the electrical cord.
1.  Split the last two inches of the end of the cord.
2.  Strip away ½" of the insulation on each wire.

I use a “wire stripper”, but it can be done without one …
The inside of lamp cord is just a bundle of thin copper wires, be careful not to damage them when stripping .

Using a wire stripper
Wire strippers have a row of cutting edges in a variety of gauges (sizes).  Use the right gauge for the wire you are stripping.  (The gauge is usually printed on the cable - 18 is common).  Self-adjusting strippers take out this guesswork by automatically selecting the proper position.


Place wire in the proper gauge spot, squeeze handle around wire and pull toward the end of the wire, the insulation should be cut from the wire and pulled off leaving the copper bundle intact.

Connecting wires

These wires should be wrapped clockwise around the lamp socket terminal screws and tightened


OR
twisted clockwise together (called splicing) with the sconce wires and covered with wire caps.


Wire Caps
Wire caps (also called wire nuts) prevent your spliced wires from touching stuff, which can cause shorts and even fires.  They also come in various gauges (sizes).  For joining lamp cord with other similarly sized wires, I use big orange colored caps (join together #18 to #14 wire sizes). I'm probably using the wrong size - but it works!
Twist them clockwise onto the spliced wires.  You don’t want to see any exposed copper!

If you are wiring a sconce to a plug (like this), you’ll want a pancake box.


The pancake box (metal open topped “box”, or cylinder, for sconces) attaches to (or inside) the wall, provides a place to attach the sconce (see the arrows pointing to the screw holes), and provides important safety security! 
When you use wire caps properly (no exposed copper), and use a pancake box, you are doing a good wiring job and greatly reducing your risk of problems.

Sorry for the LONG post – hope it helps at least one person!  Let me know if I left anything out!!! Bookmark and Share

Etched Porch Sconce NightLight

Happy Cinco de Mayo!!

Getting up to nurse and change diapers during the wee hours is hard - harder when it's dark!


So I fixed up a dirty (really dirty), old (really old), porch light.  Etched some numbers on the glass (for fun), and Wired it for a nightlight!

Bookmark and Share
Related Posts with Thumbnails