|
This is the guest post I did for The Frugal Designer (now The Design Confidential) awhile back. I love my pegboard!
And I love to create and fix up my house! except one thing that makes it hard (besides the newborn...)
I have a teeny, tiny, itsy bitsy garage.
I'd describe it as a one-car, but that's being generous. It also serves as our laundry, pantry and my "workshop".
So I have to try my hardest to be frugal with my space and fit things in with creativity and an eye for using the space wisely.
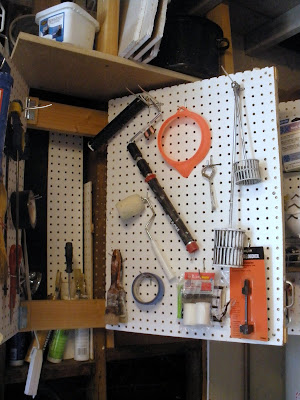
Enter my pegboard "leaves" (like in a book).
This pegboard "book" will use 32 square feet of pegboard and store a ton of tools in only 6.7 square feet of wall space!
I love 'em! This has solved many a problem of tool storage in this tiny space, and they were super easy to make! I think every small workshop should have 'em.
There are no real rules for making these "leaves"... I think 3 leaves is a good number.
1. Make your cuts
A 4'x8' sheet of pegboard can make three 24"x32" leaves. But go ahead and pick a size that works for your space.
Cut your pegboard into rectangles of this size (2 rectangles per leaf, a front and a back).
Cut your 1x2 into matching lengths (-1.5" on the short sides)
Cut a 2x4 for the "book spine" on the wall (I think the leaves work best if they are about 10 - 13 inches apart), so use 2 pieces at least 20" long for 3 leaves.
2. Screw together the leaves
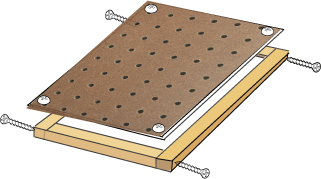
Screw the 1x2 pieces together to make a frame the exact dimensions of your "leaves".
Screw the pegboard onto the frame.
3. Build your "spine"
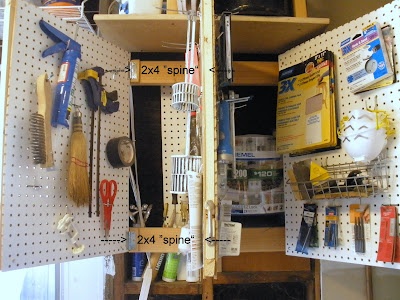
Just like for a book, the pages need to attach to a spine, 2 pieces of 2x4 mounted on the wall with screws. Screw 2 pieces of 2x4 onto the wall where your pegboard leaves will go, 1 on top , 1 on bottom (keep in mind the height of your "leaves").
Add some "blocks" (I used scrap wood) where the leaves will be mounted.
This creates a little space between the 2x4 and the leaves, so they can move easier
4. Attach leaves to "blocks" with hinges
the edge of the hinge should be just at the edge of the block
(Optional) I added little handles to my leaves to make "flipping through the pages" easier!
I hope you like my pegboard leaves! I can't tell you enough how much I love these!
"all things paint"
sanding "section"
There you have it, and hopefully I’ll be guest posting for Rayan again soon!

New to Pregnant with power tools? Don't miss a post and subscribe here...
I'm linking this post up with
 |  |  |  |  |  |
 |  |  |  |  | |
 |  |  |  |  | |
 |  |  |  |  |  |
 |  |  |  |  |  |
 Email Updates


tghytghjyj
شركة تسليك مجاري بالهفوف
yhgjnyhgumjku
شركة تسليك مجاري بالهفوف
شركة عزل خزانات vRgwpgDM5u
مكافحة حشرات mjuhEBK2YX
https://elrokn-elmethaly.com/%d8%b4%d8%b1%d9%83%d8%a9-%d8%b9%d8%b2%d9%84-%d8%ae%d8%b2%d8%a7%d9%86%d8%a7%d8%aa-%d8%a8%d8%a8%d8%b1%d9%8a%d8%af%d8%a9-0502817208-%d8%b9%d8%b2%d9%84-%d9%88%d8%b5%d9%8a%d8%a7%d9%86%d8%a9-%d8%ae%d8%b2/ OSOrAdC9aL
شركة تنظيف بالاحساء gITpsmxi5s
شركة مكافحة حشرات بخميس مشيط PVAV2utCNB
شركة تنظيف مجالس بالدمام Cd1Rg76VU6
شركة عزل اسطح بالمدينة المنورة obJZJP3jgI
صيانة افران YY4JpWo5Fz
شركة تنظيف افران بمكة 0G3Eh7xQ5o
D819866E85
gerçek takipçi
Sıra Bulucu
MFF Kupon Kodu
Azar Elmas Kodu
Total Football Hediye Kodu
Avast Etkinleştirme Kodu
Erasmus Proje
Razer Gold Promosyon Kodu
Bitcoin En Güvenilir Nereden Alınır