6:57 PM
|
by Christin@Pregnant with power tools
From the sheer amount of time I spend with my table saw you would think it’s like my 3rd baby… and it’s as messy as one too.
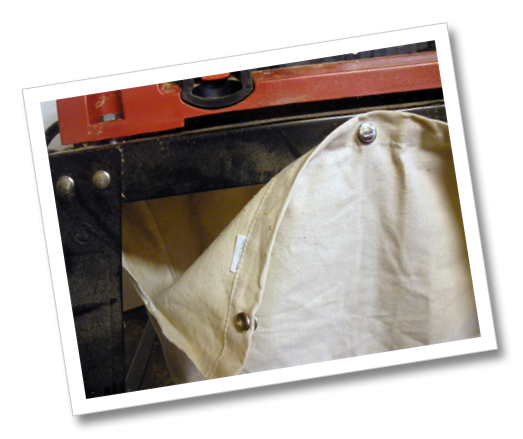
This li’l stinker needed a diaper (you might call it a dust bag). Only $5.99 at Harbor Freight – my day is made!
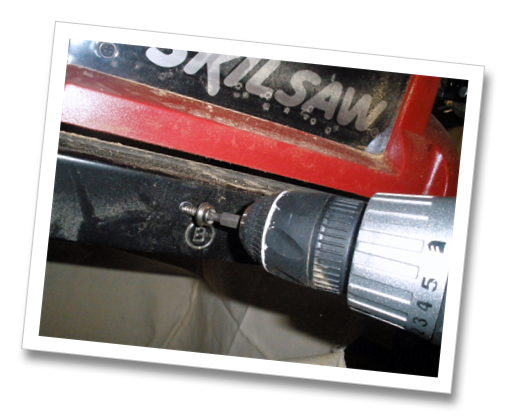
Drilled holes into the stand…
And screwed in the snaps. Took me about 10 minutes total.
And now my much loved, used (and abused) table saw picks up after itself just a little better! (Wish my boys did too)…
I’m still in the market for a small dust collection system, but until I scrape together the dough for that, I’ll have a (slightly) cleaner garage!!!
What do you think of my XLarge diaper? ;)
or my filthy little sweetheart?

New to Pregnant with power tools? Don't miss a post and
subscribe here or

8:15 PM
|
by Christin@Pregnant with power tools
I love Shanty2Chic’s easy photo displays!

I wanted to make some for Christmas presents, but I didn’t have a piece of 2x8 lumber… so what’s a girl to do?
I did have some of these left-over pieces of beadboard though…. hmmm….
So, I made some easy photo display gifts (a la Shanty2Chic) with my own twist… beadboard!
The beadboard gets an aged look with some Ralph Lauren Glaze in Smoke applied thinly with a brush.
I sawed a small piece of scrap 1x4 at a shallow angle (just eyeballed it) for holding the beadboard… and nailed in on the bottom.
I hammered some upholstery nails on the bottom to hide the ugly nails ;)
Hot glued a scrap piece of cap molding (spray painted Heirloom White) along the top,
hot glued a mini clothespin on the top,
covered the base with scrap paper.
It was pretty quick and definitely painless… until I have to give it away.
Maybe I’ll make one to keep!
That’s my precious baby up there… I really love this photo display!!!
Finally, here’s a sneak peak of an Ikea furniture transformation I’m working on.
Can’t wait to show you!
New to Pregnant with power tools? Don't miss a post and
subscribe here or
7:00 PM
|
by Christin@Pregnant with power tools
** Don't forget to enter the $65 CSN Giveaway before the end of Sunday!!
So I’ve been putting together the shelves for my bookcases this week!
This can be easy or hard, cheap or expensive, depending on your preferences.
The key is to avoid sag.

the wood whisperer
Most materials will sag at least a tiny bit under heavy books, and your eye is able to detect a sag of just 1/32” per foot!
The coolest website to utilize to avoid this catastrophe… The Sagulator. An online calculator that takes material, load, dimensions, edging, method of attachment, you name it, into account to determine the amount of shelf sag (or deflection) you will get. This is a seriously fun calculator to play with!
You want a sag of no more than .02” per foot.
Here are some handy numbers for you!
Hardback books (9x11): weight ~ 20 pounds per foot,
magazines of the same size weigh ~ 42 pounds per foot!
I copied this shelf weight limit chart from a Woodworking magazine for you… The numbers on the right are the pounds per foot the shelf can handle before showing sag (for shelves 11 inches deep).
| Type | | | Length | |
| Species | Thickness | 24 in. | 30 in. | 36 in. | 42 in. |
| Red Oak | 3/4” | 49 | 21 | 9 | 5 |
| w/ edging | 116 | 47 | 23 | 12 |
| Poplar | 3/4” | 42 | 17 | 8 | 4 |
| w/ edging | 97 | 39 | 20 | 10 |
| E. White Pine | 3/4” | 33 | 14 | 6 | 3 |
| w/ edging | 76 | 32 | 14 | 8 |
| Fir Plywood | 3/4” | 32 | 13 | 6 | 3 |
| w/ edging | 96 | 39 | 18 | 9 |
| MDF | 3/4” | 9 | 4 | 2 | 1 |
| w/ edging | 73 | 30 | 14 | 7 |
My shelves are 19 or 24 inches wide, made from 3/4” thick MDF with hardwood edging on front and back. I bought some 1x2s and routed a 3/4” wide rabbet for the back of each shelf. I also bought some nice decorative top cap molding that I used as a front edge for each shelf.
I’ve discovered that my shelves will have very little sag, even with heavy hardcover books on them. Whew! I’m glad.
But what aspect of my shelf has the biggest impact on sag? I checked the sagulator.
Basically, hardwoods sag less than MDF or plywood. I would have guessed that adding hardwood edging to my shelves helped them the most, but it's not the only factor.
One thing that made a big impact was thickness of my MDF… even 1/8” thinner = much more sag!
My shorter shelf width helps them sag less too (it is best to keep shelves under 30” wide, if possible).
So now I know, and next time I build shelves I’m checking the sagulator again!!!
New to Pregnant with power tools? Don't miss a post and
subscribe here or
5:45 PM
|
by Christin@Pregnant with power tools
We all make mistakes.
But hiding woodworking mistakes doesn’t have to be hard.
Worst-case scenario: you have to cut off the bad part and use the lumber somewhere else.
Other times a careful placement, trim or wood filler, caulk or spackle will do wonders!
Here are some of the mistakes I made while building my bookcases…
The lumber slipped on the table saw and got gouged
 |  |  |
| fill with wood filler | and sand | |
Molding cut too short
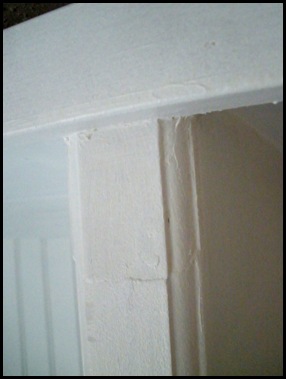
Cut a bevel into the end and a short add-on piece and splice them together.
Enormous gaps
 |  |
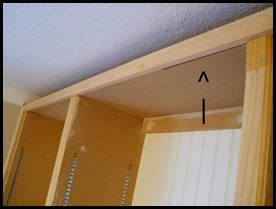 | 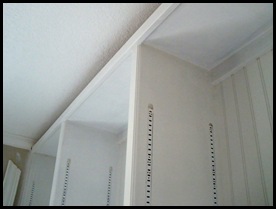 |
| use multiple layers of caulk | – smooth after each application |
I started making the wrong angle cut in the baseboard.
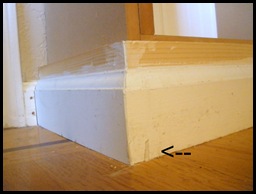 | 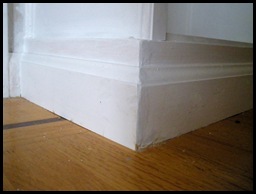 |
| tried caulk, but wood filler | worked better (needs more paint) |
Nail holes
 |  |
| use wood filler to fill and | then sand. |
I guess I should figure out when you should use caulk and when to use wood filler or putty (and then share that info with you!)
New to Pregnant with power tools? Don't miss a post and
subscribe here or
8:33 AM
|
by Christin@Pregnant with power tools
I’m sorry this project is taking forever (really, really sorry – you have no idea!)
I got all the cases into place, and started putting on the trim, finished one half of the room, and ran out…
I chose mullion molding (normally used to create panels in windows), because I wanted something more ornate than plain 1x2s, I wanted something a little wider (1-3/4 inches instead of 1-1/2).
I went to 5 (5!) hardware stores but couldn’t find anymore – they just didn’t have anymore (someone must be doing a serious window project!)
The trim is important because it hides the front edges of the cases (MDF edges are not pretty so best hidden with hardwood),
and there’s a gap between the cases too, so this was a must!
So I made my own mullion.
With my router (and roman ogee bit) and some 1/2 inch hardwood ripped to width.
This turned out even better, because on this side of the room some of the gaps were wider or narrower, so I could make 1-1/2” or 2” mullion (for perfect fits!)
I thought I saved time by buying my mullion, but now I’m glad I made my own (I wished I had done this for both sides!- My mullion molding looks way better than the store-bought stuff!)
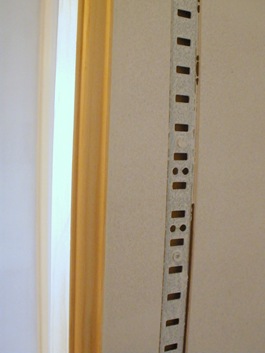 |  |
| My Molding | Store Molding |
The cases are now primed and the project is back on track!
New to Pregnant with power tools? Don't miss a post and
subscribe here...
9:11 AM
|
by Christin@Pregnant with power tools
These tips aren’t for DIY house building – I don’t have any experience with that ;), but rather those tasks many of us women and beginner DIYer may tackle in the course of fixing up and decorating our homes.
Things like building furniture, installing cabinets, wainscoting and molding, painting, and hanging chandeliers or fans.
Safety
Have a cell phone on you (on your body!) in case you get hurt working alone. Let someone know what you are doing and agree to call in periodically (every 2 hours or so). Make sure you both understand what should be done if the call is overdue (such as having them check in on you).
You should always wear and use personal protective equipment (goggles, face mask, gloves, hair tied back), but this is especially true when you are alone – reduce your risk of getting hurt as much as possible.
Use safe work practices. Do not remove the blade guard from your saw. Have an emergency safety off switch for your table saw. Turn off your tools when making adjustments. I will post more on power tool safety for beginners in a future post.
If you are using a particularly dangerous power tool (like a table saw or nail gun) it is not advisable to work alone. I also do not do electrical work, or work at heights alone ever. I am often doing the work myself, but am not by myself… my husband and kids are usually within earshot.
Large, Ungainly and Heavy Items
When working with sheet goods (a 3/4” MDF panel can weight over 80 pounds), I am especially in need of that extra pair of hands – particularly if they are strong.
When I need to work with this heavy material alone, I try to break it down into more manageable pieces. Get the sheet cut to the sizes you need or roughly a little bigger for finish cutting at home. I get the guys at my hardware store to cut my MDF into 4 12” wide boards, 8’ long. This works great for my bookcase – I take the boards home (now only 20 pounds each and easy to carry), and rip them to the 11” width and whatever height that I want.
If you don’t want to have your large sheet of plywood or MDF cut in the store, there are special-purpose tools that you can buy to help you out. These are great for moving some things, but not a piano, by yourself. But be careful not to overextend yourself. Getting help is better than getting hurt.
Moving
Use clamps on the edge of your plywood, MDF or particle board. They are much easier to grasp than the edge of the board. Together with a panel carry handle, I can move a medium weight sheet of plywood or beadboard by myself.
Use a handtruck or dolly to move your large item. Below is a dolly specifically made for moving sheet goods.
For those who will frequently move heavy panels of plywood or install drywall by themselves, a good investment is a panel lift hoist.
Measuring
The end of the tape measure can be clamped into place when you don’t have a helper to hold it for you.
A folding ruler, or a metal or wooden measuring stick are better when clamping your measuring tape in place is not an option. They are easier to use on walls, ceilings or open spaces, and make useful straightedges too. You can even make your own. For other difficult applications or for making your own measuring tape, try adhesive measuring tape.
Finally, if you have the moolah for it, a laser measuring device is the coolest toy in the sandbox.
Cutting
A roller stand in front of a table saw makes it easier to feed longer pieces of wood across the saw when working alone. These vary in price from tens to hundreds of dollars. An outfeed setup is important for those large sheet goods also. These can also be bought.
I use a simple homemade table resting on adjustable height sawhorses to hold long boards or sheets of MDF prior and during cutting, and a store-bought folding table to catch the saw’s outfeed. The only problem here is that the wood doesn’t easily roll on the infeed side, but I may build a simple attachment with rolling PVC pipe to solve that problem.
Assembly and Fastening
Clamps
There are lots of different kids of clamps. They can help hold a project together for you, giving you plenty of time to fasten it with nails or screws. I love my quick-clamp bar clamps, they slide quickly to adjust, much faster than turning the bolt on a C-clamp, and are tightened with a squeeze.
Even if you don’t work alone, it is in your best interest to become familiar with the variety of useful clamps available to the beginner DIYer.
Toolbelt
Another must-have for the solo DIYer is a tool belt. For example, when you are holding a French cleat board against the wall (in order to hang a headboard or cabinet), you just need to grab your drill from the tool belt holster, drill your pilot hole, put the drill back, grab a nail and your hammer (again from the tool belt) and fasten that board in place.
If you are building with nails and don’t need or want to drill pilot holes, start your nail before you pick up the board.
Nail Guns and Screw Guns
Or invest in a quality pneumatic nail gun (they can be operated with one hand) that will shoot multiple nail sizes. The screw gun is the comparable device for auto-feeding screws from a clip to screw items together one-handed.
Holding in Place
Don’t underestimate the power of sawhorses (especially with the additional help of clamps and vises) for helping you hold your projects in place while you work.
Here’s a cool trick to use when installing crown molding by yourself. Use a nail in the wall near the ceiling to help hold the far end of your molding in place while you attach the near end. When you are done, just remove and fill the nail hole.
Of course, you can also buy and use some of the new products available to help with this (see below).
 |  |
| Crown Molding Clips slip easily on and off of a nail hidden behind the molding |
 |
| Little Green Suckers suction to the wall to hold up your molding (requires air compressor) | 3rd Hand adjustable jack and brace for molding, cabinets, plastic sheeting, ceiling materials, flooring… |
Another tool that will support a cabinet or light fixture while you work, is a “3rd Hand”, basically an adjustable jack, brace, or clamp. Make sure you get one that will be able to support the weight of your item, as they usually support up to 70 pounds. These can also be used to hold down flooring while the glue dries, or holding up a makeshift plastic tent while spray painting. One of these can help with crown molding, but a few 2x4s would work too.
Finally, if you want or need to do “major construction” work alone, the resource for you is Working Alone by John Carroll.
Anyone out there regularly do DIY by themselves? Got any pointers?
New to Pregnant with power tools? Don't miss a post and
subscribe here...
 Email Updates